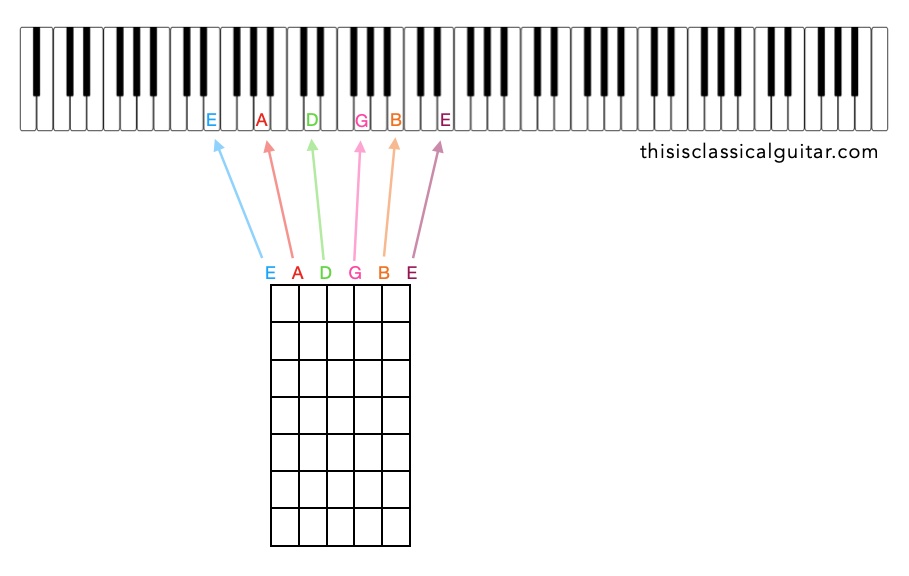
How to tune a classical guitar by ear or with an electronic tuner – In this lesson I’ll cover various ways to tune your guitar as well as outline tuning priorities for beginners to more advanced players. It is essential that you learn to tune by ear but having a good electronic tuner will ensure that you get pretty close to the correct pitch very quickly as you develop your tuning skills. More advanced students can also do research on equal temperament, just tuning, and early music tunings.
Go to the bottom of the article to see how I personally tune my guitar.
Practice Tuning Every Day – Learning to tune accurately is a skill that must be developed and practiced daily. I highly recommend you tune by ear every time you play the guitar but beginners can also have an electronic tuner around for accuracy after they try tuning by ear. It’s important to develop skills but I don’t my students playing way out of tune all week.
Tips: Always listen to the sound when tuning, never turn the tuning peg without the sound ringing if possible. You want to hear the sound go into tune. I recommend always tuning up into the correct pitch. If you have trouble zeroing in on the tuning, start from a much lower pitch and tune up into the correct one. I find this is much easier than doing micro adjustments up and down.
Stages/Levels – Because beginner guitarists don’t know the guitar fretboard very well they usually learn to tune in different ways at different stages of their development.
Stage 1 – Tune by ear using a piano or tuning fork, the string-to-string method, but also have an electric tuner or app around for help and as a time saver.
Stage 2 – Tune as above and check the tuning with chords and some of the key you’re playing in.
Stage 3 – Tune referencing all notes to one string, checking with chords and the key of the piece you’re about to play. Also know how to use harmonics to tune.
Stage 4 – Use a combination of ways for efficiency and precision.
Using an Electronic Tuner or App to Tune
It is essential to learn to tune by ear but I don’t know many pros that don’t have a tuner around. Sometimes you need quick tuning accurate to A 440hz. My favourite tuners are the piezo type that that read the vibration in the wood so you can tune even if other musicians are playing music in the same area. So helpful in ensemble rehearsals. The one I recommend below is so small it just stays on my instrument at all times.
Summary: Fast, fairly accurate, some can tune with other sounds in the room. But you might end up relying on gear and battery life and it’s not necessarily 100% accurate.
Recommended Tuner: D’Addario Micro Tuner
Tuning by Ear
There are plenty of ways to tune by ear and all are great to learn. For most beginner students I start by teaching them to use a tuning fork or piano and the string-to-string method as an easy way to start. Get proficient at one method of tuning at a time. I know it’s tempting to try to learn all the ways but most students need at a minimum a few month or more on each method.
String-to-String Tuning
This method of tuning is great for beginners and gets you into relative tuning for at-home solo practice. Without a reference pitch such as a tuning fork or piano you might not be in tune with everyone but you’ll be in tune with yourself.
Summary: Easy to do for beginners, no extra gear needed. The main problem with this method is you might get a little off on each string so consistency is difficult across all six strings. String that are next to each other might be fairly in tune but strings far away might be quite out of tune.
Steps (also see diagram)
- Play the 6th string at the 5th fret and tune the open 5th string to the same pitch.
- Play the 5th string at the 5th fret to tune the open 4th string.
- Play the 4th string at the 5th fret to tune the open 3rd string.
- Play the 3rd string at the 4th fret to tune the open 2nd string.
- Play the 2nd string at the 5th fret to tune the open 1st string.

Using a Piano
Using a piano to tune the guitar is great as long as the piano itself is well tuned. You can either just grab a reference pitch such as E or A or tune each string to the corresponding key and pitch. If you’re grabbing just a reference pitch you can use the string to string method to complete your tuning.

Using a Tuning Fork or Metronome

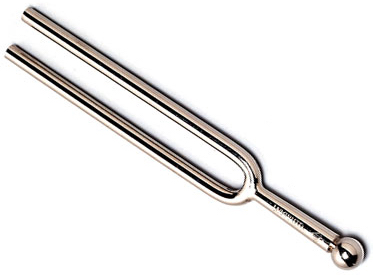
Tuning forks give you a pitch to match your tuning to. You strike the tuning fork against something and it vibrates at the correct pitch without use of batteries or electronics. Usually it is pitched to A 440hz which is the standard pitch for tuning. You can tune your 5th string A to the tuning fork and use any method of tuning. If using string-to-string simply tune the 6th string A at the 5th fret to the tuning fork as well.
Many electronic metronomes include an A 440hz reference pitch for tuning as an extra feature which you can use to tune just as with the tuning fork.
Tuning to One Reference String
In this method you use one reference string to tune all the strings. I like to use the 5th string (A) because I tune the A string to the tuning fork or reference pitch of a metronome.
Pros: Much better consistency across all the strings. Less chances of compounding your mistakes.
Cons: Be careful of the upper position notes as intonation can get off on guitar. Because action is higher in upper positions, pushing the string down to the fret will bend the pitch can cause tiny intonation issues. Try to stick to the first few frets if possible. Better used in combination with harmonics (see “How I Tune My Guitar”)
Example Using the A String

Example Using an Open E String – You can use either E string but the diagram only shows the low E.

Tuning with Harmonics
This method of tuning can be very accurate as you’ll be able to hear both strings at the same time which makes pitch matching much easier. It’s also great because both strings will sound without you having to fret a note and so your hands are free to turn the pegs. The method is similar to the string-to-string method above. FYI, here’s a lesson on Common Natural and Artificial Harmonics.
Summary: Both notes sound at the same time which is great for accuracy. Plus it’s hands free once you strike the notes so that makes this practical as well. As with the string-to-string method there can be inaccuracies across the strings so you’ll want to check some chords after.
There are few ways to tune with harmonics but here is an easy one to explain. You might want to see the video for this one!
- Match the 6th string, 5th fret harmonic to the 5th string, 7th fret harmonic
- Match the 5th string, 5th fret to the 4th string, 7th fret
- Match the 4th string, 5th fret to the 3rd string, 7th fret
- Match the 6th string, 7th fret to the open B string
- Match the 5th string, 7th fret to the open E string

Correcting with Chords and Key References
All the methods above have various pros and cons and even electronic tuners or apps can be slightly off sometimes. Therefore, it is always a good idea to play a few chords to check your tuning. Chords in first position that use all six strings are preferable. However, also play some material in the key that you’re about to play in as every key has its oddities especially with our equal temperament system. More advanced musicians may also check certain intervals depending on their knowledge and what they are about to play. I often check various octaves.
How I Tune My Guitar?
I use a combination of the above tuning methods when I tune my guitar. I try to take the best parts of them all to get as accurate as possible. I usually start by using my electric tuner or a tuning fork for the A string which gets me close.
I tune everything to the 5th string (after getting A 440hz from a tuning fork, metronome, or electric tuner). So after I tune the 5th string to a pitch I don’t touch it again. It is my unchanging reference pitch.
Here’s what I do next (without changing the 5th string)
- Harmonics to match the 6th string to the 5th string
- Harmonics to match the 4th string to the 5th string
- Match the open 5th string to the A on the 3rd string, 2nd fret
- Match the B on the 5th string, 2nd fret to the open B on the 2nd string
- Harmonic at the 5th string, 7th fret to the open E on the 1st string

Then I check chords, intervals, and the general key – Then I check chords and intervals within the key. Final cadences are a good idea to check. Mainly just chords and usually a few octaves. If the piece I’m about to play has any closed upper position octaves I always check those as well.
This might sound like a lot of stuff to do but it really only takes 30 seconds or so, especially if you’ve been tuning everyday.


I always have to retune downwards my 3 top strings after playing 5 minutes. Is this due to cheap strings, and it is most noticable on the 3rds.(guitar player and luthier) John Hartley
Thirds in equal temperament are really out of tune because they are too wide, and if an interval or chord sounds out of tune it is often the third (or 12th). To see how much too wide, try tuning the beats out of the G-B open string major third. You have to drop the B from 246.94Hz to 245Hz. That is very noticeable. ET 5ths are a tiny bit flat so any string tuned to the 7th fret harmonic E will be just a tiny bit sharp compared to ET, and thirds using that string will be even more out of tune than they already are. My tuning technique is similar to yours, but I avoid the use of the 7th fret harmonic in either direction.
I enjoy your videos and have purchased some of your Bach arrangements.
Best regards
There is another way to tune with a tuning fork.
Strike the tuning fork, then slide it along the string, say the E string. As you slide it along the the volume of the TF will increase and be at its loudest when it reaches A on the string. So for the E string this should be above the 5th fret. If it isn’t just, adjust the string until it is. The D string above the 7th fret; the G above the 2nd; the B, 10th fret,
This is a rapid & relatively silent way to tune. It’s also fascinating.
David