This is a visual reference guide for my students studying classical guitar. This set is focused on basic left hand technique for classical guitar. Just remember that this is a reference for guitar and not necessarily how you will position your arm. Everyone’s body is different so you’ll have to experiment to see what works for you. However, as a basic reference these photos should guide you in the right direction. Find more articles at the Lesson Archive Page. For free lessons, sheet music, and pro videos join the Email Newsletter. Help support the site & free lessons by Sharing, Caring, and Subscribing.
Left Hand Position for Classical Guitar
This is the main video for beginners and review for any level. This comes via my Youtube Channel.
The five main tips for beginners I mention in the video are:
- Left wrist is straight, not over-extended
- Left palm and knuckles are parallel with the strings
- Left hand thumb is vertical and behind 2nd finger
- Left hand fingers are curved and on fingertips
- Left hand fingers play very close to the fret
Left Hand Technique and Exercises
Scottish guitarist Matthew McAllister gives a great lesson in left hand technique for classical guitar. Matthew has fantastic technique but most importantly a very musical technique. He’s also a great teacher so enjoy this lesson. This comes via the wonderful Siccas Guitars and their fantastic YouTube channel. This is a great lesson with equally good camera/video work. The book he mentions is Scott Tennant’s Pumping Nylon on Amazon which is excellent.
Basic Left Arm Position for Classical Guitar
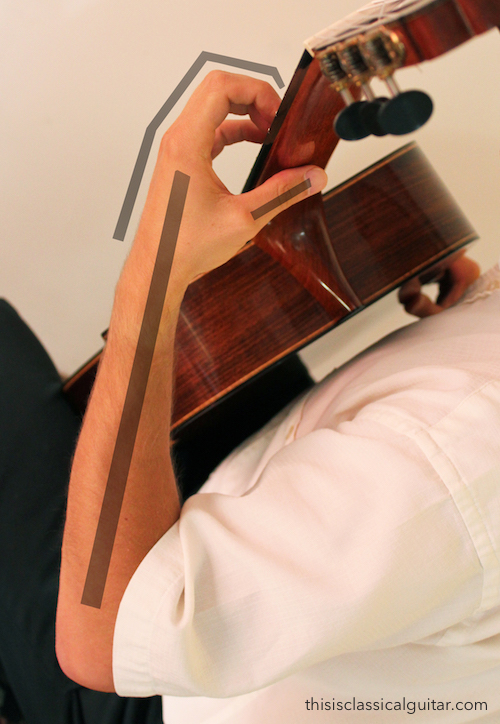
Let’s start with aligning the left arm before looking more closely at the hand itself.
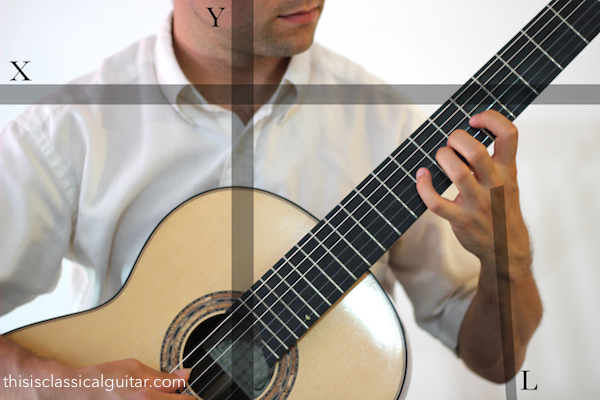
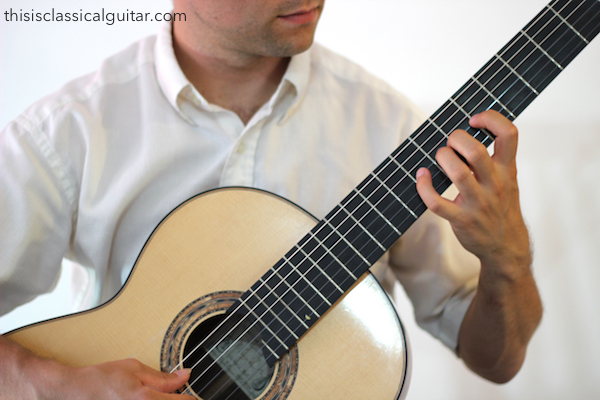
Tips for the Left Arm:
- Maintain good posture and sitting position by following the X- Y axis with the shoulders and the spine. See the article on Sitting and Posture for Classical Guitar in case you missed it.
- Your left wrist is should be generally flat, or in a slight and natural arch.
- The left hand is straight, in-line with the forearm. Line L shows this straight line. Do not angle the wrist or bend it in a concave or convex angle.
- The left hand knuckles are parallel with the strings (more on that later when I post the article on the left hand).
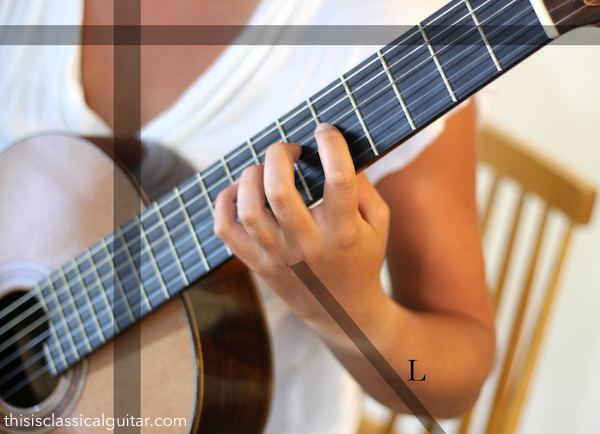
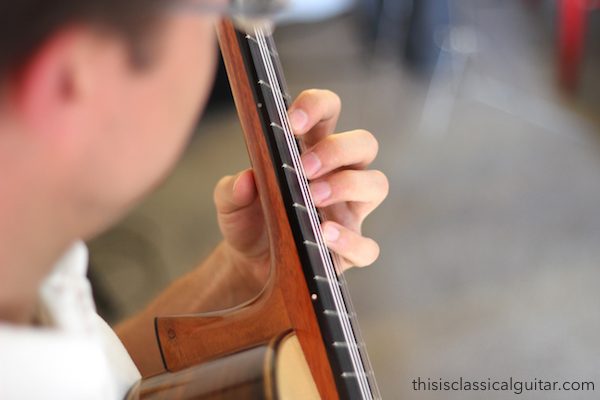
More tips for the left hand:
- As I said before, I’ll post more in the article on the left hand, this is really more focused on the arm position
- Your left thumb should be vertical and not bent at the tip joint
- Your left thumb should be behind the 2nd finger
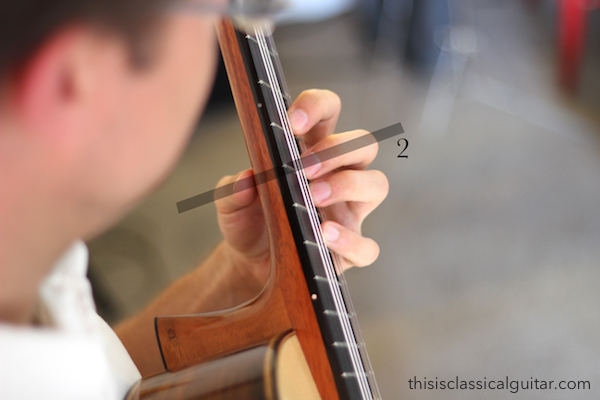
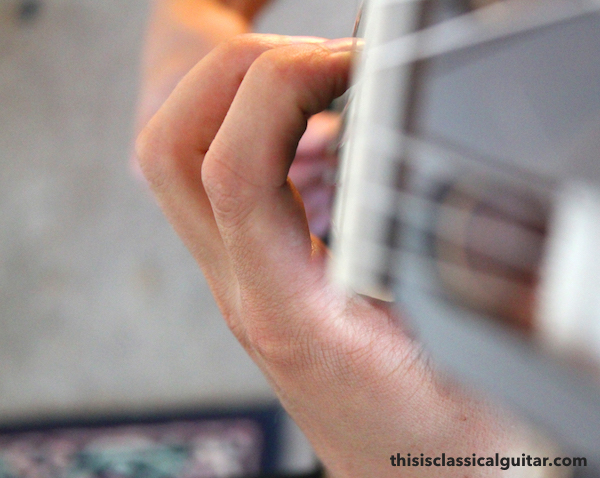
Tips for the Left Hand Fingers:
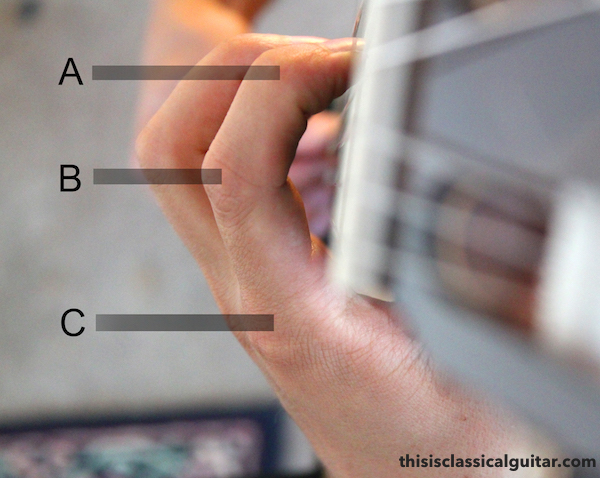
You must play on your fingertips and curve the finger at every joint. On occasion this might not work out to be picture perfect but for basic melodic playing, scales for example, this is a good general rule.
A = Curvature at the tips joint
B = Curvature at the middle joint
C = Curvature at the knuckle
Below is one of my students, her wrist is just a bit more bent and there is a little less curvature at the knuckle but otherwise very similar. Everyone sits differently so there will always be slight variations. Also, there might be slight differences based on where you are playing on the guitar and the specific shape or string you are on.

The next two photos combine the photo angle of the left arm position with the left hand position. I’m extending the guitar slightly out from my body for the benefit of the camera.
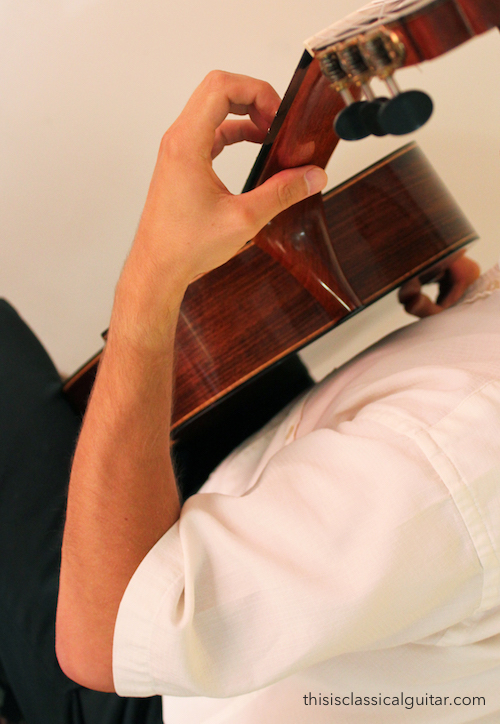
On the next one you can see the wrist in-line with the forearm (try to reduce any bending the wrist). You can also see the bend at each joint and knuckle. The left hand thumb is not bent and remains vertical and straight (but relaxed).
The next series of photos shows each finger playing in a four finger position. The first photo is all fingers down. For the following photos the camera angle is from the player’s perspective, so if you hold your guitar you should see something similar to this.
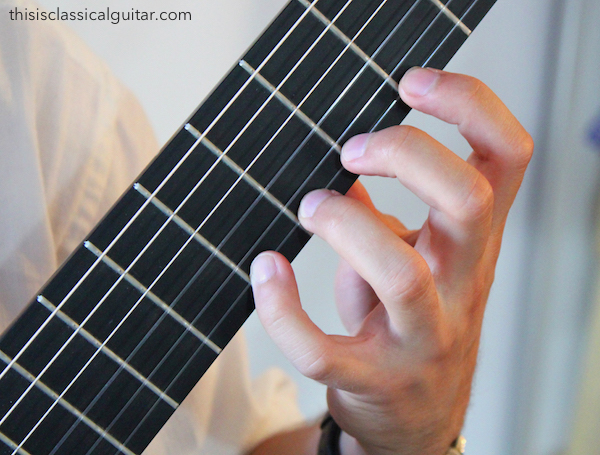
Left Hand Finger 1:
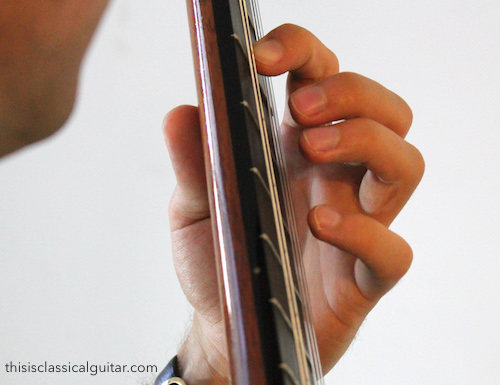
The first finger comes in at an angle. This creates an angle of about 100 degrees to the fingerboard. Or if you think of the angle of the finger but toward the headstock then it creates a 45 degree angle similar to the 4th finger.
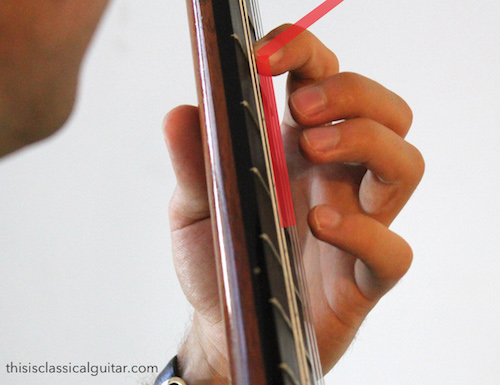
Left Hand Finger 2:
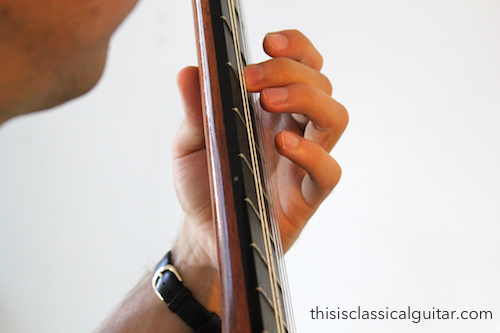
The 2nd finger comes straight in creating a 90 degree angle.
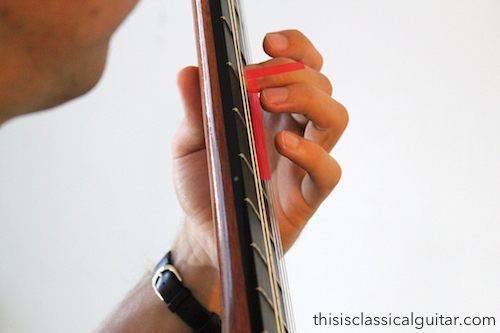
Left Hand Finger 3:
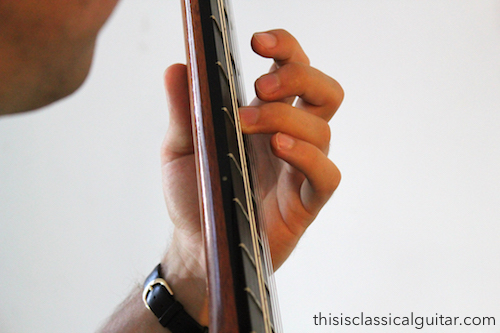
The 3rd finger, similar to the 2nd, comes in straight on creating a 90 degree angle.
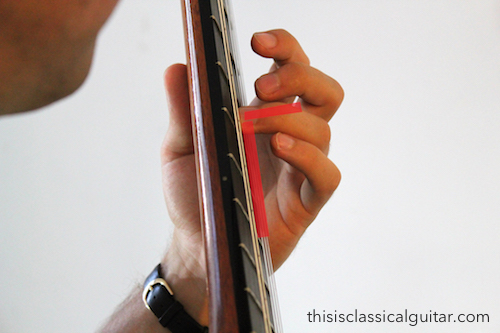
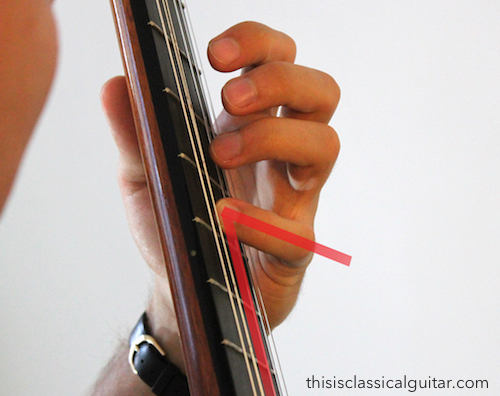
Left Hand Finger 4:
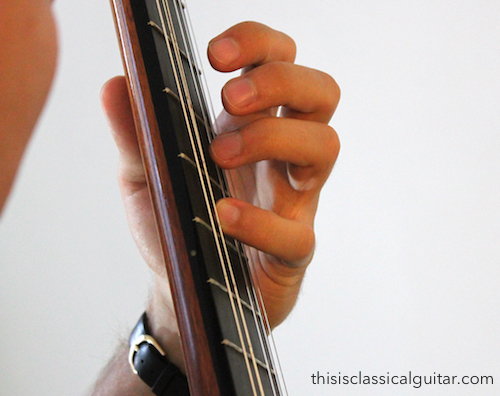
The 4th finger comes in at about a 45 degree angle. This is correct because your fingers naturally point inward to the palm.
More free lessons: Lessons for Classical Guitar
Books by Bradford: Sheet Music Page
Check out my educational book series
- Classical Guitar Method Volume 1, with Video Lessons, 100 pages, Free PDF
- Classical Guitar Method Volume 2, with Video Lessons, 89 pages.
- Classical Guitar Technique: Essential Exercises, Scales, & Arpeggios




this seems tough
Was there anything in particular you found difficult? Let me know and I can maybe help you find a solution.
Just transitioning into classical guitar style. Nice to feel like I have the hands and fingers in the right direction. Taking a lot of practice to keep them there as I play, but that’s the journey! Thanks a ton!
Hello Mr. Bradford, thank you for all your gratuitous classical guitar instruction. Now I know the thumb ought to be directly behind the second finger when it comes to placement on the neck of the guitar, but I’ve still got one question: does it matter how high or low the thumb goes on the back of the neck? For example, is it alright if the thumb moves a little closer to the high E string, or the other way, toward the low E string, or does it need to stay right there behind the D and G strings? Thank you for any help you can offer.
Yes, the thumb can move up or down with the hand in order to keep that relaxed cup shape.
Thanks!
I came back here after having trouble with strings buzzing against adjacent fingers when playing the Giuliani exercises in your Method Vol. 2. Now I’m working on the 1-2-3-4 exercises on all strings, strumming across the adjacent strings to check for buzzing. My 2 finger that’s giving me the most trouble for some reason, though I’m paying careful attention to all the details you’ve shown and described here. I’ve made some progress toward eliminating the buzzing, but at the expense of a lot of added tension. Hopefully that will improve with time and practice. Thank you for everything you’re providing here!
I’ve been playing guitar for decades, and off and on have worked a little bit with classical style and repertoire, and have come back to it again lately. It seems like playing on the tips of the fingers is more critical than in other styles. When you are talking about playing on the tips of the fingers, are you talking about arching them so that the tip is essentially fretting the string almost at the fingernail? It seems like when I’m trying that technique, there’s more accuracy in that way than playing a little bit farther back from the nail. – Jim R.
In general, yes. But you don’t want to be so close to the nail that it goes between (ouch).
How much should you play when beginning, it’s painful! 🙁
Ease into it slowly, maybe start with 15 min a day. It shouldn’t be painful though, make sure to double check your guitar position and body posture.
This website is really helpful for, thank you so much. And I’m a beginner of classical guitar, and I found in my textbook, they always begin with apoyando. But in most of websites have I seen, it always begin with arpeggio. Why ?
Thank you for the great information. Just wondering what is that orange circle thing on the back of your guitar?
On the top side of the guitar? Probably my portal cover. It’s a magnetic cover that covers the portal when not in use.
Hello.
Thank you for this excellent website.
No matter what I do I cannot achieve parallel knuckles. If I follow all the rules about the left arm and wrist my palm refuses to sit parallel to the neck. It becomes parallel when I go down to the 10th position. Otherwise the index finger knuckle is closest to the neck and the pinky knuckle is furthest from the neck.
Any suggestions?
It could be a posture and guitar position issue in combination with the position of the left arm and elbow. Hard to say without see you of course. Also remember that these are kind of ‘text-book’ examples and there will be some oddities or unique circumstances for every person. Compare yourself to many professionals. You can subscribe to my newsletter to see good videos regularly. http://eepurl.com/hGOak
I have the same challenge with being parallel to the frets.
Is it good to straddle 2 adjacent strings with one finger ,as in violin playing ,for notes played at the same fret ?
Yes, we call it a barre. In classical guitar we really only barre with the 1st finger unless the repertoire demands something specifically awkward.
Thank you for this site and all the information; additionally, I have four of your books. I’m enjoying learning but am having problems with my left hand. My ring finger does not naturally come down at a 90 degree when I have other fingers down (especially the middle finger). This is a challenge as I frequently can’t achieve sufficient pressure to prevent a buzz or muffled sound. Also my reach is not a full four frets with all my fingers down. (I’m assuming this will improve over time.) Are there any specific exercises I can do to correct the angle of my middle finger? Or should I simply do some focused work on being able to apply sufficent pressure with it at the angle it is at? Thanks
Hi Jennifer, diligent practice with the intention to improve that finger will certainly help but there could be other factors involved. Relaxation is the big element for most people. Unless your finger sticks out when your hand is relaxed (for example, when you walk around not thinking about it) then you’ll need to learn how to relax your entire body when playing. Also, don’t think it’s all about the hands, your guitar position, footstool, angle and other factors can effect what happens with your hands. Having a good teacher is the key as they might notice something you have not thought of. Some pros have oddities in their technique so don’t stress too much, but you’ll want to understand your own technique and find solutions.
Thank you very much for this well illustrated and well explained post. One thing is still unclear for me, if I might ask: How do you press down the strings – by pressure of the thumb only, or does one use the gravity of the left arm (or a combination)?
Use very little of the thumb or “vice-grip”. If you play close to the frets and curve your fingers directing the energy directly into the fretboard it takes very little strength to move those little strings. Yes, utilize the weight of the arm and hand.
Ahhh, thank you for explaining. I will have to concentrate on that. I tend to squeeze the neck between my fingers and thumb
Thanks for the helpful post and video! This certainly helps me a lot since I’m learning to play guitar by myself. Keep up the good work!
Thanks so much for being so specific in regards to the angle of each finger. Following the instruction contained in this page alone will prevent many poor habits.
Thank you…I had been really struggling with this!
Hi can I ask a question – when I was first learning guitar and trying to play classical guitar I was told that you have to keep your wrist bent and not to flatten it. I.e. the way I keep it straight when I am playing classical violin, I was also told you in classical guitar you never let your left thumb come over the top of the guitar. Is this correct? It is sensible for certain playing but when playing open string chords even simple Gs Cs for example this seem to put more strain than is strictly necessary on my left wrist which I have ongoing strain issues with and when I come to trying to play jazz chords where you physically have to to flatten your fingers to mute the strings you’re not playing I find it almost impossible to play without my thumb over the top of the neck.
Is this really such an issue? And what should I do to sort it?
Thanks.
In general, a straight or naturally arched wrist is the way to go. Bending the wrist puts strain on the muscles and is not ergonomic. The thumb over the neck don’t work well on modern classical guitars because of the wide neck. However, remember that this is the text book model for modern ergonomic playing on classical guitar and you might have different influences that suit your needs better. However, to answer your question, my students are required to play as the above pictures suggest. Just remember to explore the ideas and concepts (the reasons why) and also experiment with your posture, arms, hands, etc etc… Hope that helps.
Just reviewing a video lesson from Jason Vieaux which he outlines the inside knuckles on the neck. He mentioned that it’s something he’s seen John Williams do, and it gives the advantage of a straight wrist as well as additional strength and leverage. He mentioned this is beneficial to practice this way with scales where there is no notes on the high E string. Very cool to see this referenced in multiple sources. Thanks!
Excellent production! I’ve seen the movement of the left hand up and down as a solid unit, with the thumb moving with the hand. I have never seen the knuckles on the neck as you have demonstrated here. Very interesting.
It’s the very best I’ve seen. Wow!!! It could not be any more clear and informative. Thank you. Joe Francis
Thanks Joe!